Saturday, September 26, 2015

Rice and Bean Salad


There has been a lot of well-deserved attention lately to the amount of food wasted in the US, from the farm fields all the way to grocery stores, restaurants, and our own homes. With this in mind, I started considering some of the ways that I have found uses for relatively common leftovers.

When I cook rice, I often make a large quantity; you can see my method for baking rice at http://frugalfastfun.blogspot.com/2010/10/cassoulet-for-crowd.html. But, what to do with this rice when you aren't in the mood for some kind of casserole or if you have more rice than other leftovers from the takeout or carry home box from your latest restaurant trip?

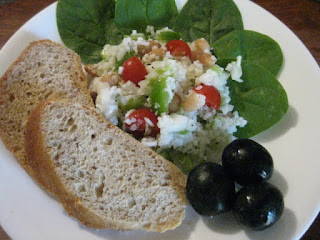
Another peek into the refrigerator revealed some bell pepper, celery, spinach, and something I've recently discovered, mayocoba beans. Sounded like the start of a great salad, especially since I actually have some cherry tomatoes and cucumber from my mostly failed garden. It is very easy to allow produce to go past its prime and end up in the compost (or worse, just the trash), so this seemed like a good day to use all of these foods while nice and fresh.

A little experimenting and tasting, and I came up with the following salad that will go just right with some chicken salad sandwiches and fresh fruit for a light dinner tonight. You can easily make your own changes to this recipe, based on the contents of your own refrigerator. Lightly steamed broccoli flowerets or carrot slices, frozen peas, or green beans could all be added for more color. Kidney or black beans could replace the mayocoba beans.

The result? A tasty, healthy salad and a little bit of pride in being able to avoid some bit of food waste in your own kitchen. Not a bad combination.

Rice and Bean Garden Salad

3 c cooked rice, well drained--be sure rice is cooked only until just tender, not too soft
1/3 to 1/2 c finely diced onion, to taste
1 c sliced or diced celery
1/2 c diced cucumber
1/2 c diced green pepper
1 1/2 c cooked and well drained mayocoba beans (see NOTE)
1 T fresh basil, finely chopped
1 t fresh thyme leaves

1 c cherry or grape tomatoes, halved
2 c baby spinach leaves


Dressing
1/3 c vinegar
1/4 c canola or olive oil
3-4 T sugar or more, to taste
1 t salt (or more, if both rice and beans are prepared without salt)
lemon pepper to taste


1.  Combine the dressing ingredients and whisk until well blended.


2.  Toss together the first 8 ingredients. Pour the dressing over this mixture and stir just until everything is well mixed.

3.  Chill at least two hours. Just before serving, stir in the tomatoes.

4.  If serving individually, spread the spinach on the plate and top with scoops of the salad. If the salad will be served from a large bowl, chop or tear the spinach leaves into bite-sized pieces and toss into the mixture with the tomatoes.

NOTE: If mayocoba beans are not available, substitute any other white bean or even garbanzos.

Quick Variation

Use a prepared balsamic vinegar dressing (Costco has a really good one) in place of the dressing above, using only enough to barely moisten all the ingredients. If you are using unsalted beans and/or rice, you will still need to add a bit more salt or lemon pepper.


A couple of notes/hints on preparation, illustrated

The batch of rice that I had in the refrigerator was quite moist. To be sure that the dressing didn't end being too diluted, I spread the rice on a plate and let it "dry" for about an hour in the refrigerator, following some instructions I found on the internet for "dried rice." Unfortunately, that didn't seem to help all that much, so I just went to a much more direct method, putting the rice in a fine strainer and pressing it lightly. If your rice is pretty "dry" already, you can easily skip this step.


And then there is the photo of the oil and vinegar. I have added another one below, showing even more clearly that this measuring cup is not clean! I had used the cup to measure the rice, the onions, and other vegetables, and then used it, without washing or even rinsing, to measure out the vinegar and oil for the dressing.

My point?  Just this. Streamline the steps you take in putting foods together and you will save yourself a lot of time, both in prep and clean up. Just a small hint, but over time, if you are accustomed to having to have a separate clean cup or bowl for every step, think about just reusing them without clean up between.


Tuesday, September 15, 2015

No Pectin Plum Jam


I have fought a losing battle with the squirrels in my yard this year. I planted two (sour) cherry and two plum trees a few years ago, and this year was the first that I had a really nice amount of fruit growing and prospering.

Until, that is, the fruit began to ripen. Then, in one weekend, the squirrels ate all but two cherries off those two trees, and they then began to systematically harvest the plums as soon as they showed even the slightest sign of ripeness. Since I was out of town several times when they were attacking, I ended up always being behind them, and my futile attempts at netting the plums were in vain.

Fortunately for me, my kids have also planted plum trees, and they live in a neighborhood almost devoid of squirrels. As a result, I ended up with several pounds of "windfalls" this week. After making two desserts, I still had enough to make a small batch of plum jam.


Plums are among the fruits with high levels of natural pectin, so there is no need to add in any commercial pectin. Depending on the variety of plum and ripeness (less ripe fruit has the highest pectin levels), it may take less than half an hour to get to the just right stage of jelling. I like to use a wood spoon for stirring the jam, as it seems to work best for me to test for jelling, as noted in step 5 below.

An advantage with not using purchased pectin is that you can make a batch of jam that matches the amount of fruit that you have. It is wise never to use more than about 6 to 7 cups of fruit, however, as the mixture may not evenly cook and/or it will need a much longer time to jell, leading to an overcooked flavor.

If you have more (or fewer) plums, just use about a 4 parts sugar to 5 parts plums ratio--or a little less, as in this recipe, if your plums are very sweet. Just don't cut back too much on the sugar, as it not only adds sweetness; it also helps in the jelling of the final product.

No Pectin Plum Jam

5 c plum pulp
3 3/4 c sugar
1/4 c reconstituted lemon juice (such as ReaLemon)

To make the plum pulp:
1.  Chop the plums coarsely and put in a heavy pan, with just a tablespoon or so of water to keep the fruit from sticking. Cut out any bad spots but keep the pits in the mix. Cover and cook the plums over medium heat, until the fruit is very, very soft. This will take about 25 to 30 minutes.


2.  Run the fruit through a food mill or press through a coarse colander. (I will admit it: I washed my hands well and just pulled the pits out of the mixture with my bare hands! It didn't take very long and I was able to maximize the yield. Plus, the fruit closest to the pits is often the most flavorful.)


To make the jam:

1. Place a small saucer or two in the freezer. 

2.  Measure the amount of pulp that you have and use 3/4 cup sugar for every cup of pulp (perhaps a bit less if you have very sweet plums). Use about 2 1/2 to 3 teaspoons of lemon juice per cup.

3. Put all the ingredients in a large pan (this will boil up quite a bit) and bring to a boil over medium-high heat.


4.  Continue to cook uncovered, stirring occasionally to avoid sticking. Depending on the plums, it will take anywhere from half an hour to 45 minutes to reach the jelling stage.

5.  Testing for jelling:  Hold the spoon with which you are stirring the jam above the mixture and allow the jam to run off the spoon slowly. Watch for when the drops of jam start to "sheet off" the spoon--instead of individual streams of liquid flowing down, the drops start to combine and flow in only one or two syrupy streams.  When it begins to do this, remove one of the saucers from the freezer and put a few drops of jam on the plate.

When you can run a rubber scraper or knife through the jam and it holds its shape, the jam is ready to take off the heat.

At this point, the jam can be put into sterilized jars and kept in the refrigerator for a month or so, the easy way to work with smaller batches of jam. However, if you want to store the jam on the shelf, you will need to process the jars in a hot water bath.


Processing Jam in a Hot Water Bath

You will need a pot (a "canner" ) large enough to put water in an inch above the top of the jars you are using, and you will need to use canning jars with lids specifically made for canning.

Bring water to a rolling boil in the canner and gently lift the sealed jars into the water. Cover and allow the water to return to a boil. At this point, set a timer, and continue boiling gently for 10 minutes for either half pint or pint jars. Remove the jars from the boiling water and allow to cool.


Addendum:

Okay, I cannot tell a lie. I had a small cluster of black grapes (from Aldi, not local) that really needed some attention. Why not, I thought. I already was using two varieties of plums, some deep purple, some rosy red. The grapes would represent less than 10 percent of the total fruit in the jam, so I chopped them up and added them to the plums. The result? Just a richer, fruity flavor, with no real hint of grape in the final product.


Quick Banana Bread


While I had the oven heating for an Apple Raspberry Crisp, I thought it would be a good time to use up some bananas browning a little too rapidly on the counter. Since I also had some mayonnaise in the refrigerator, it was a good time to do some more experimenting with that interesting ingredient.

I discovered there are quite a few banana bread recipes made with mayonnaise on the internet. However, almost all of these seemed a little bland, without any spices or vanilla.

Really?

How can you think of baking quick breads without some spices and flavorings?  Cinnamon and vanilla are almost as basic for me as onion in chili or meatloaf.  I like ginger in breads and cakes, and it goes well with bananas. Freshly grated ginger would be even better here, but I didn't have any in the house, so the ground form had to do.

And then there is the whole wheat flour, another thing missing from the internet recipes I found.  I won't pretend this is a totally "healthy" bread, but I prefer to use whole grain flours whenever I can, for the flavor as well as the better nutrition. However, it's not a deal breaker if you don't have any; just use all enriched flour if you don't have whole wheat.

A few notes about bananas:  The riper they are, the more sugars they contain, so you can cut back a little on the sugar. However, besides providing sweetness, the sugar in quick breads like these provides a softer texture; cutting it out completely is likely to leave a much less tender product.

Many older recipes (and some new ones too!) will list "3 bananas" or some other number, rather than a measured amount. A problem with this approach is the variation in the size of each banana. However, you might be tempted to throw away part of a banana if the 3 or 4 called for here equal more than a cup. Please don't do that! How can a site that lists "frugal" as its first word ever recommend such waste?! Be aware that a little extra banana (probably even as much as another quarter cup) will not lead to failure. The bread is likely to be just a little more moist, but you probably won't even notice the difference.

On the other hand, if you have only 7/8 of a cup or so of banana and you don't want to start another one, you can just fill the cup with milk--or applesauce if you prefer. The key here is to be sure the bread is moist enough, but a small variation in amount shouldn't cause problems.

Hmmm, maybe those old-fashioned cooks had the right idea by just saying "3 bananas."

That's a pretty long introduction to a really easy recipe. The longest part of making this is the baking, so it could be whipped up as a last minute dessert after you get home from work. However, as with many breads of this type, it is even better the second day.

Final result of the experiment? A tender, almost creamy bread with lots of flavor (but not a hint of a "mayonnaise-y taste).

Easy Banana Bread

1 c mayonnaise
1 c mashed bananas (about 3 to 4, depending on their size)
3/4 c sugar (if the bananas are very ripe, you could cut this by a few tablespoonsful)
1 t vanilla
1 c enriched flour
1 c whole wheat flour
1 t baking powder
3/4 t baking soda
1 t cinnamon
1/2 t nutmeg
1 t ground ginger (optional)
1 c chopped walnuts (optional)

1. Beat together the mayonnaise, mashed bananas, and vanilla until smooth.

2. Sift the dry ingredients together and add to the banana mixture. Stir gently just until completely combined.

3. Turn the batter into well oiled pans. Since I prefer smaller slices, I use an 8 1/2 X 4 1/2 inch pan along with two 3 1/2 X 6 inch pans--the size of those small disposable pans you can buy in sets of three. You could also use two of the 8 1/2 X 4 1/2 pans, but I only have one of those. Using the smaller pans means I always have a small loaf to share with a friend or neighbor too.


4.  Bake at 350 degrees. (If using a glass pan, lower heat to 325 and add a few minutes to the baking time.)

The smaller breads will take about 18 to 20 minutes while the larger loaf will take about 28 to 35 minutes. Test by inserting a toothpick in the center; it should come out with no unbaked batter clinging to it.


5.  Allow the breads to cool in the pans on a cooling rack for 15 to 25 minutes before removing. Store in the refrigerator.


Variations:

Add half a cup or so of raisins or dried cranberries with ( or in place of) the nuts.

If you are one of those people who need chocolate in everything, a cup of semi-sweet chocolate chips could be folded in with the nuts. I'd omit the ginger and increase the vanilla to 1 1/2 teaspoons.

If you really, really like chocolate, stir in 1/3 cup cocoa with the bananas and yogurt and then add chocolate chips with the nuts.